Adapting the Minolta Autopak 700 Lens
I adapted a weird little lens for use with digital mirrorless cameras
Created Jun 9, 2024 - Last updated: Jun 9, 2024
I’ve been trying to branch out with my photography hobby, and look for new ways to engage with it. Recently, that’s meant getting into the world of vintage lenses. I switched to mirrorless a couple of years ago to enable adapting more lenses, and I’ve been having a lot of fun with it. Not content to just do easy adaptations, I’ve started looking into even more obscure lenses to work with, and this project is my first small step in that direction.
Project Overview
So, for this project, I decided to adapt the lens from a Minolta Autopak 700. Although camera-wiki generously describes this 126 film camera as “something of a collector’s item”, they are quite inexpensive on ebay. It is a fixed lens camera made for Kodak 126 cartridge film, and sports a quite nice Rokkor lens. 126 film cartridges were manufactured from 1963 until 2008, but these days are quite hard to find and not many places process them. So in a way, this project is breathing some new life into this lens that otherwise might never have taken photos again.

The astute reader will notice I said “fixed lens camera” above. Indeed, this lens was never meant to be removed, and there is no mount what so ever on the back. Thankfully, I’m not the first to walk this road. For much of the project, I followed this excellent DIY video by Vintage Optiks on Youtube, although I eventually took a slightly different approach.
Getting the lens
The lens is held onto the camera via a retaining ring, and I used a lens spanner wrench to unscrew it. This was actually fairly difficult. The retaining ring was good and stuck initially, so I soaked it with some nail polish remover to help loosen it up. The notches for the wrench to slot into are tiny, and I scratched the ring up so much trying I was worried I’d stripped it entirely. Also, the side of the wrench kept hitting the open film door, so I had to reposition it constantly. However, in the end, it worked.


Once the retaining ring is removed, there’s just a small wire holding the lens to the camera. I snipped that, and the lens was now free. The aperture control slider, the ring that holds it in place, and a few metal shims all come loose from the lens at this point. From the tutorial video, I knew to expect this, but it’s still a little disconcerting to see the whole thing in pieces. There are two pins (you can see them on the above image) that are going to get in the way, so I snipped them off and filed the remaining bits flush enough, following the video.
The next step is to wedge the shutter open. Like many fixed lens cameras, the Autopak 700 chose to put the shutter in the lens rather than the camera body. Still following the Vintage Optiks instructions, I jammed a folded up piece of paper behind the shutter cocking lever and triggered the shutter release. This worked perfectly, and the shutter is now jammed open in a relatively non-destructive way.

The next step is restoring the aperture control slider, and the associated ring. Vintage Optiks recommends salvaging a little piece of metal from the main camera body for this (every part of the animal, I guess?), and that worked well enough. A bit of quick work with my snips left me with an L-bracket a couple of millimeters in size. This gets super-glued to both the actual control lever and the slider that allows user access. I was pretty skeptical about this, but it worked fine.
It’s worth noting that the metal pin that got snipped off earlier has something to do with aperture control as well. I think it’s related to the auto-exposure function. There’s a locking lever that holds it in place, but if the aperture control is rotated one stop “past” fully open, that lever will disengage and the pin will be free to move. This pin also adjusts the aperture, in a clickless way, and if it isn’t pushed all the way to the left, the aperture control won’t work right. It’s easy enough to just slide it back in place if necessary, although that gets to why I ended up going in a different direction than the Vintage Optiks method.
At this point, the lens is operational again. The shutter is open (which is what a modern camera expects, as it will have its shutter in the body) and the aperture control is working. But, there’s still no way to mount it onto anything. This is where my method and the Vintage Optiks method diverge.
Vintage Optiks recommends super-gluing an M42 adapter onto the back of the lens at this point. I was uncomfortable with this for a few reasons. First, the surface it needs to be glued to isn’t level, there’s a screw in the way that needs to either be removed or filed flat. Second, that’s also the surface the aperture control ring travels around. A stray drop of super glue could leave me unable to adjust the aperture. Finally, I was concerned I might need to access the back of the lens again, for example if that pin needed to be pushed back again.
Recall the retaining ring from the first step. Well, there’s a threaded post which that ring screwed into. I thought to myself “well, that’s a perfectly good threaded post; surely I can get something that screws into that on one side, and is M42 on the other side.” I got to learn a new skill here, in that I’ve never had to figure out completely unknown threading before. I used a digital caliper and a metric thread pitch gauge, and got an 18.5mm outer diameter and 0.5mm thread pitch.
Then came the side quest of how to fabricate a part with that threading to mate to the lens. I spent a lot of time reading stuff I didn’t understand about 3d printing to try and figure out if anyone I knew had a printer with enough resolution to make 0.5mm pitch threads. I still don’t know if that’s possible or practical, because I ended up finding a custom machining company that would do it in aluminum.
Enter RAF Camera. I was able to use their custom parts designer tool to lay out exactly what I wanted - essentially a flat ring with an M18.5x0.5 thread on the inside and an M42 thread on the outside. Although I wasn’t very confidant in my measurements, I did get it right and the adapter fits perfectly onto both the lens and my M42 to Canon-R adapter.
Trying it out
Since my intention was to use this lens mainly for close up and pseudo-macro images, I decided to take it to Baltimore’s Rawling’s Conservatory to get a feel for it.
The first thing I learned is that it is very difficult to focus with this lens. Not only can it not focus to infinity, it really can’t focus at any distance at all. I think this is just a problem with the adapter, specifically, I think the flange distance for M42 is too long for this lens. That said, it’s possible I janked up the focusing mechanism while extracting the lens.
On close subjects however, it is quite sharp, and by just moving the camera back and forth I was able to get small subjects in focus. This is usable, although not ideal. I’ll be spending some time trying to improve the focus situation down the line.
Here are my three favorite images from the test shoot:

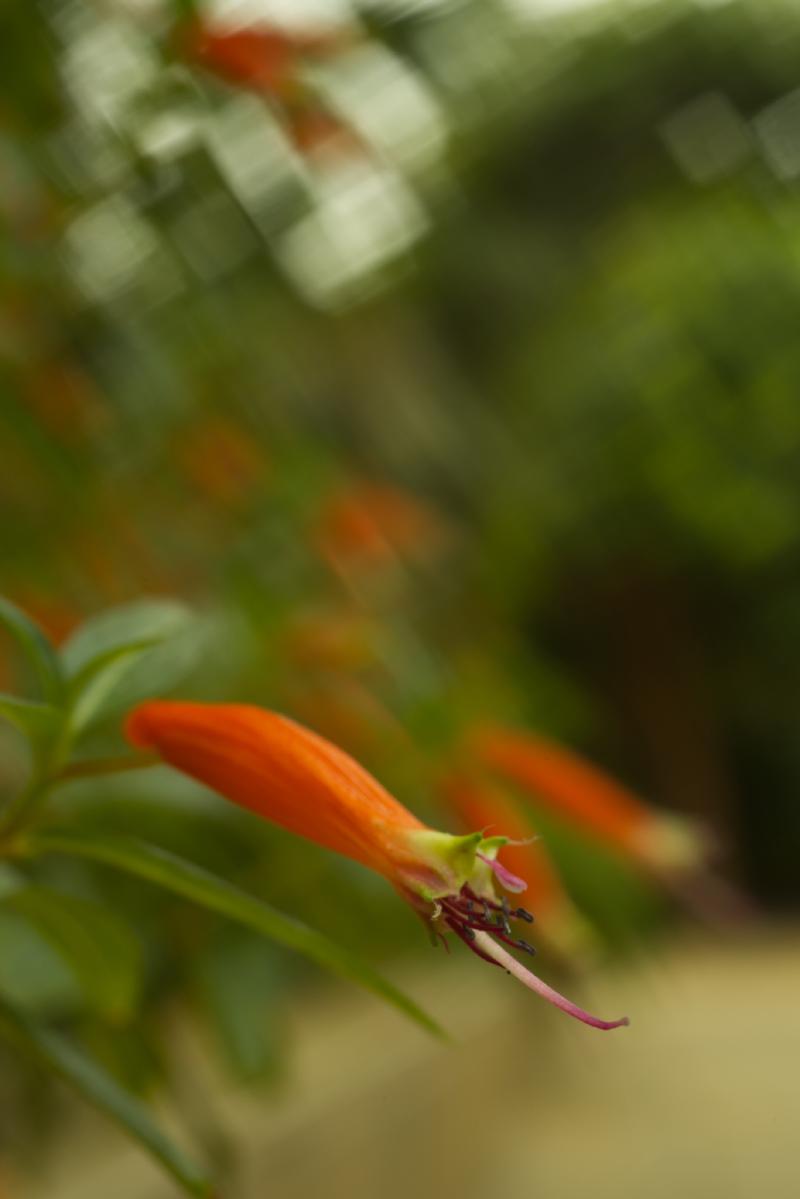

These test images are pretty lightly processed. Just a bit of exposure and color correction, and cropping.
In all the test images, you can see the characteristic square bokeh, which is one of the features of this lens I was most excited about. As this is a property of the four blade aperture design, it’s most noticeable when the lens is stopped down, which is quite interesting for a bokeh effect. I particularly like in the third image, how the plant acquires an almost linen paper texture in the mid-ground. I also though it looked like an analog pixelation effect. It’s my first time playing with a lens that has square bokeh, and I’m quite enamored with it.
Final thoughts
So, was this worth it? Well, it depends. Between the camera, new tools, custom made adapter, and various odds and ends (not to mention a couple of off the shelf adapters I tried that didn’t fit), this was not a cheap project. Still considerably cheaper than buying a new modern lens with all the bells and whistles, but definitely not a $20 lens either.
That said, I learned a lot, and feel more confident in my ability to mess around with small mechanics. I’d never taken a camera apart before, so that was cool. I learned how to measure threading, which seems like it’ll come in handy in other projects. And I had fun doing it, which is probably the most important part.
Will this lens have a permanent home in my kit? Probably not. It’s pretty delicate, and the back is totally exposed. It’s like the opposite of weather sealed, so I’d feel pretty nervous taking it on a significant hike. Also, with the lack of any mid range focusing, I’m not sure how much use I’d get in the woods.
Will I plan macro shots around this lens? I think so. I really like the effect, and I want to do more with macro. In a controlled environment, like the conservatory or my back yard, I’m not going to worry about the fragility of the lens as much. And I think having a weird effect lens makes macro more appealing to me. We’ll see.
I’m looking forward to more projects like this. It’s possible I’m becoming something of a “lens hipster”, but I think I’m okay with that.